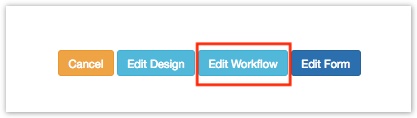
- Click Edit Workflow
There are 3 mandatory workflow steps in all slips
1. Create Slip
2. Queue to send
3. Send

You can add approvals to the workflow before the slip is queued to send.
Approvals occur in two steps, which are added to the workflow in pairs:
- Send for approval - This step triggers an email to be sent to the User(s) in the approval step.
- Approve - The nominated User approves the form in this step.
Helpful Hint
By default, all Steps have Any User set as the person performing the action.
The Send for Approval and Queue Slip to Send Steps have 'Any User' as the person performing the step in the workflow. In practice, this means the person on the previous step in the workflow will be able to click a button to trigger the next step. You can leave these as-is unless you have a special use case.
The Send step is automated and you don't need to assign a specific User.
To Add an Approval Step
- Click Add New Step.
- Select Send for Approval and click Update Step. This choice will add both send for approval and approval steps.
To Assign Users or Groups to Workflow Steps
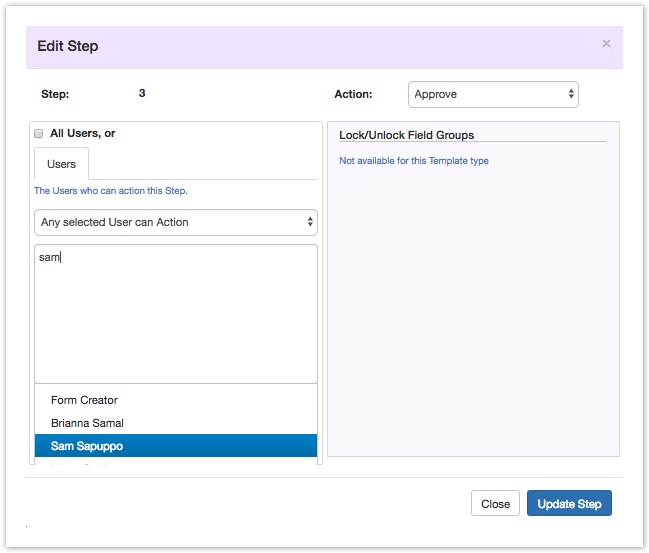
- Click the Edit Step Icon for the Approval step

2. Open Approve Slip step and select the Users or Groups who can approve. You can also select to have the form creator choose to have any individual User or Group do the approval (Choose from one Selected User), or have the Approval step sent to all Users and Groups in that workflow step (Any Selected User Can Action).
Tips to avoid having a Workflow stuck on a step:
- Add multiple Users or Groups to the Approval Step.
- Select Any Selected User can Action so whoever is available can do the approval.
3. Click Update Step.
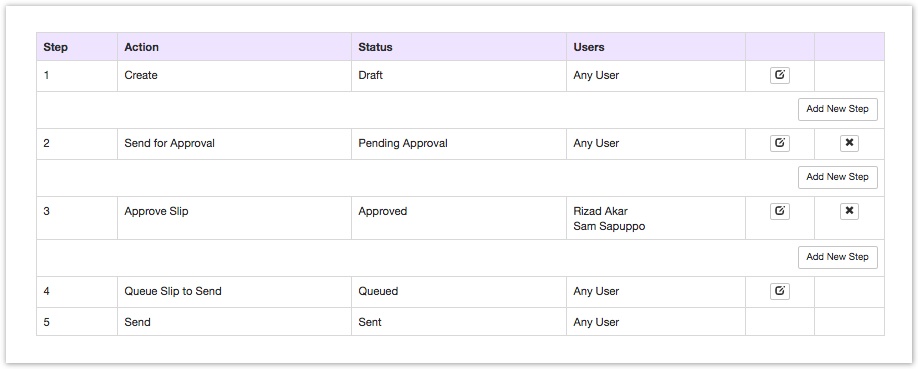
4. The below workflow allows any user to create a slip and send it for approval. This will trigger an email notification to the approvers Sam and Rizad. The first person to log in can approve the slip. Once the last approver approves the slip the slip automatically send to queue.
5. You can add multiple approval steps by clicking Add New Step after each Approve Slip Step. Always remember to have the Workflow include a Send for Approval step before the Approve Step as this triggers the email notification to the approvers.
More articles in this category:
- Building a Slip Template in EdSmart
- Creating a Form Template
- Designing a Form Template
- Improvements to Form Designer
- Adding an Approval Workflow to a Form Template
- Managing Fields on Form Templates
- Lock and Unlock Fields on Form Workflows
- Managing your Form Template Workflows
- Conditional Workflows
- Allow parents to create multiple forms of the same type
- Form Template Categories - how to create and edit
- Parent Initiated Form (PIF) - Form Template Packets
- Form Template Library
- Duplicate a Form Template
- Process Module
- Send a School Form to Staff
- School Form for Student and Parent Response
- Workflow scenarios for School Form for Student with Parent Response
- Field Configurations in Template Designer
- Validate Feature to enter and capture correct data
- Add a Web Page Link in a Long Description Field
- Parent Slip File Uploads
- Create Slips from the Form Templates page
- How To Create a Form With a Notification That Is Sent To The Form Creator On Behalf Of The User.
- Assign User Groups to Workflow Steps
- Streamlining Template Creation with Default Approval Workflows